Surveillance systems have not only come a long way from black and white images on a single monitor, but have also become very cheap to buy and install.
They now offer many more options than ever before. Modern DVR Systems can record to a hard drive instead of a video cassette for instant playback. They also usually have night vision built in and can turn on or off with built in motion detectors.
One of the coolest things is most have built in IP or internet capability meaning I can see my cameras in real time on my smartphone, tablet, or laptop.
Recently I installed a four camera surveillance DVR system I bought from Amazon. After connecting the cameras to the DVR and setting everything up including real time viewing on my smartphone. I was amazed how far these systems had come since I first purchased one in 2003.
After showing friends and family how easy and inexpensive it was to keep tabs on things at home everyone wanted one. Soon I was installing many camera DVR systems.
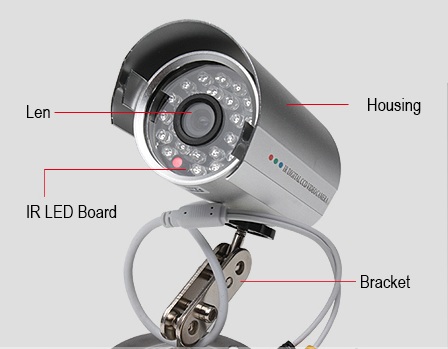
The camera system I will be showing for examples here is a H.264 Network DVR Four Camera System.
I am using this system as an example. Everyone will have a different need and configuration. Such as wanting a six or eight camera system.
Also I buy DVR camera systems without a hard drive because they are cheaper, and it is easy to install a hard drive for me. Another person may want the hard drive pre-installed. I have a background in computers so this is easy for me, but may not be for someone else.
If you don’t feel comfortable installing a hard drive yourself than H.264 Network DVR come with hard drives pre-installed, here is an example.
Buying a camera surveillance DVR system
The way I buy a DVR Camera system for someone is to break down what they need. Then check out where they want to install the system. This can be done with a simple check list.
Night vision
Internet capability
Motion detectors
Water resistant/Water Proof
Built in hard drive
Wireless or wired
Type of output to monitor
Audio output
This is a basic check list but these are the main things to keep in mind when looking at a camera DVR system.
Night vision is a must and most cameras will have this feature.
Internet capability is also a must have in my opinion.
Motion detectors are usually built in and are very handy because the system will only record when something moves saving hard drive space. Although with compression and a good size hard drive most will not fill up for a month or more if run continuously. Some prefer to run their system on constant record because far off objects will not trigger the motion sensors.
Water resistant/Water Proof is also a must have. The cameras will be outdoors and we do not want to worry about them getting wet.
Built in hard drive. Many systems do not come with a built in hard drive. Often they will be listed with recording capability but without a hard drive installed it will not record. So be sure to check the listing if the DVR has a hard drive or not. If it does not have a hard drive then installing one is always an option. This is a personal option depending on the person. Installing a hard drive is a easy task for me but may not be for someone else.
Wireless or wired. Personally I do not care for wireless camera DVR system. Simple things can mess up the connection such as microwaves, Cell phones, Routers and so on. Even though they seem to many as a easy solution since no wires need to be run. They often are less then desirable. There are times when there is no other option but if at all possible running the BNC cable is the best way. Most systems come with a BNC cable that carries the video, sound, and the power for the cameras. The DVR kits usually come with 50-100 ft per a camera. Extra cable will have to be bought if more length is needed. BNC cable is supposed to be good up to 300 ft although I have never had to run it this far and it may also depend on the DVR.
Type of output to monitor. Most DVR system come with a standard VGA output which most monitors have. Check the monitor or TV you plan on using for what inputs it uses HDMI/VGA then check the output of the camera kit you plan to buy.
Locating the DVR
Where the DVR is located will be something to think about, such as do you want it to be on one of your TV inputs or a standalone monitor?
Plan this out especially if you run cable as once the BNC cables are run it will be a bit of a pain to change it later.
Another thing to think of is if a house is broken into the first thing most thieves will do is take the DVR. Some people choose to hide the DVR in spots were a thief will not easily find it. I have seen people even build special small fake walls so a thief would not easily find their system. Where ever you locate it keep in mind once the cables are run most people will not want to go through the pain of moving them.
Unless it is wireless having power and a CAT 5 cable to your router is also something you will need. Power is usually not a problem but having a connection to your router may be. You can always run the system without a internet connection and if you do not have a smartphone, tablet or laptop this may be a option. Otherwise a CAT 5 cable will have to be run to your router.
Connecting the cameras
The cameras will have to be located at optimal positions. Many people will already know where they want the cameras located such as the front and back doors. This really depends on how many cameras the system has. Such as a four camera system I usually point one down each side of a house but if there are six cameras covering no-cover-zones will be easier.
The camera will have two connections one for the power and the other for the Video and sound otherwise called a BNC connection.

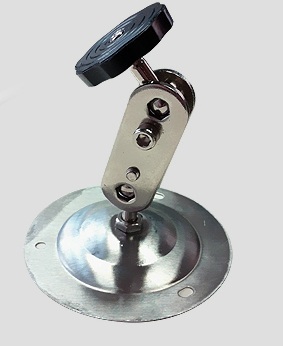
To attach the camera to the outside wall use the screws to screw the base on, then the camera will screw onto the base.
Wireless is always a option since running the wire is the most challenging for most people. If you know someone in construction or is very handy this would be a good time to call them. Every house is different but usually you drill a hole under a eve from outside the house to the attic. Use a old wire coat hanger or something similar and tape the camera BNC connection to it. Then pull it into the attic. From the attic you will be able to feed it down a wall or were ever you need to.
With mobile homes or homes on pilings you would run the BNC wire under the home and up to a wall.
This is the most difficult part and there is no real way to say how to do this since ever house is designed differently.
Turning on the DVR

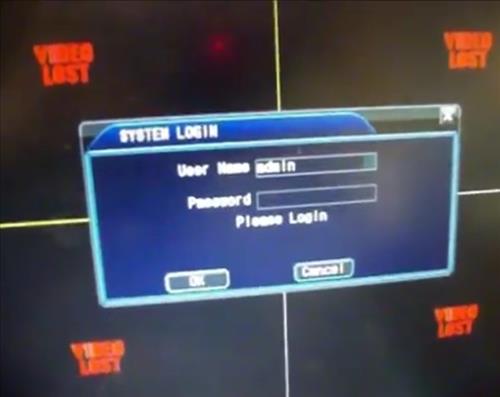
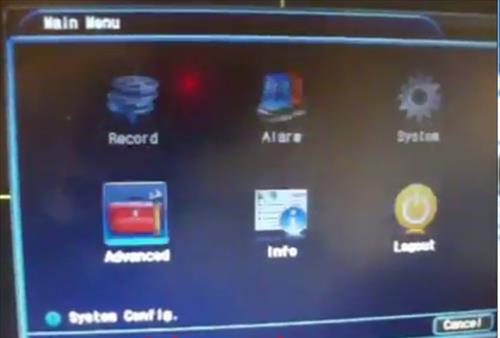
Once you have everything connected turn the DVR on and you should see the cameras you installed. At this point no doubt you will want to adjust them around for the best view. Every DVR will have its own setup as far as logging in, motion detectors, play back and so on. Most DVR login is username “admin” and the password is left blank, but yours may be deferent so be sure to have the manual on hand.
Connecting the surveillance system DVR to a smartphone or tablet
Being able to monitor your home when you are away is one of the greatest things about a modern DVR camera system. At this point the System should be up and running with the cameras being viewable on a monitor. The DVR should also be connected to your router with a CAT 5 cable.
I will not be able to explain everything about IP, subnet mask and so on. So this is a basic how to on what needs to be done to view your system online. Plus to make things worse every router has a different setup. The router is what all your devices talk to before going out to the internet.
The example giving here will be specific to my router and every router has a different setup menu and options.
The router will be have to be setup for Port Forwarding. Some routers make this simple and some make it harder. You will have to Google your router model number and how to port forward it. Every router has a different setup and way of doing this.
The basic reason we need to port forward is you will have an internal IP address that your router assigns each of your devices. Your computer, tablet, Smartphone will all have an IP address that is assigned by your own router. The world beyond your router will not see these internal IP address. Most of the time the router handles this with common ports such as port 80 which is a web site port and will automatically direct your devices.
With a DVR you will need to port forward the port used by the DVR to the outside world so you can view your cameras.
Things you will need
Internal IP address of the DVR
External IP address. This is the address the outside world sees you as, to see this simply Google what is my IP address and Google will show you.
The monitor port the DVR uses to connect.
Here is the setup network information from my DVR. This will give you the information on the DVR side. (This information will be different for you. This is only an example)
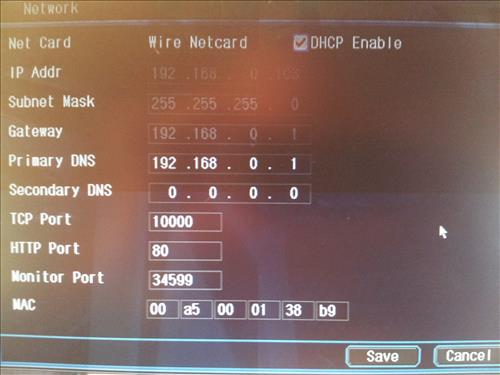
So for me my internal IP address for the DVR is 192.168.0.103 and the monitor port is 34599. The External IP address can be found by Google “What is my IP address” and Google will show you at the top of the search. With this information you will be able to Port Forward your router.
Once this is done you are ready to connect to a Smartphone, tablet, or Laptop. If you are connecting with a laptop simply typing in the external IP address in a browser will bring you to the log in page and you should be able to see the cameras. To connect with a Smartphone or tablet you will need a app.
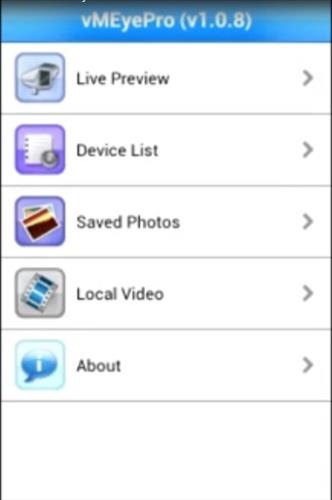
There are many apps out there and most cameras systems will come with a app to use. The one I will be using as an example is called Vmeyepro.
As with any app support is everything so if you have a better one use it. I am not connected with this app. I am only using it as an example.
Click on device list and enter any name for the Device Name.
For the address enter the external IP address
For mobile port enter the mobile port of the DVR
Then enter your username and password.
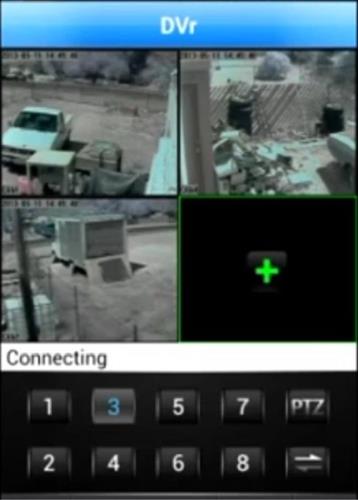
Here is an example of a HVAC company I installed cameras for.

I have an 8 Channel DVR that stopped recording, but the live view was not affected. There was an error message about the harddrive. The DVR and cameras were installed in June 2012. Can this DVR be repaired (DVR Model 7008MX, Made in Korea)?
I recently purchased an 8 Channel DVR from Amazon.com, but I am not pleased with it. It does not record properly. Case in point: Two days ago, I exited and re-entered my driveway, and the activity was not recorded. Today, I walked out my front door to the curbside mailbox, and two cameras should have captured my walk, but one camera picked up my walking. A car across the street backed out of its driveway, and the vehicle’s image vanished like a ghost. I couldn’t tell if it travelled east or west from the driveway.
If my old DVR can be repaired, I would much rather have it than this new one that I purchased less than two weeks ago.
I can not see my cctv footages on my phone. I tried but I couldn’t. Can you help me please
Do you have any recommendation for installing a system with a DVR hard drive where the hard drive will be outside? I am concerned that if I put the HD in a sealed box it will get too hot. Would a vented water proof container be a good solution?
Thanks in advance