
The Raspberry Pi model 2, 900 Mhz quad core, 1 GB RAM version is out and of course like many others I am doing my favorite things such as installing Kodi/XBMC.
That is the main thing I love to do with the Raspberry Pi is to install Kodi/XBMC and my favorite video plug-ins such as 1channel, Project free TV, Ice films and so on.
I currently have Kodi installed on two PCs and a Raspberry Pi. The last Raspberry Pi version B+ 512 MB RAM is what I previously ran Kodi Media Center on and it does work, although a bit laggy at times.
The specs of the Raspberry Pi model 2 are five times better in processing power and twice the RAM, so there is no doubt that while the Raspberry Pi B+ model was good the model 2 takes things to a new level.
What does it take to install Kodi on a Raspberry Pi model 2?
The first thing needed is the hardware components and then once they are had than the software components can be loaded to run Kodi.
Here is a list of the hardware requirements.
Raspberry Pi model 2
HDMI audio video cable
USB Wi-Fi adapter or Ethernet connection
Power Supply
8 GB Class 10 SD card.
An input control such as a keyboard or a wireless mouse which is what I like to use. USB infrared remotes are cheap and something I might invest in the future.
The parts above can be bought separately or you can simply buy a premade kit on Amazon.
 
One thing that may not be included in a kit is a Micro SD Card Formatter. Your computer may have one but a SD Card Formatter is needed to write software to the Raspberry Pi micro SD Card. I bought
this USB SD card formatter for less than $9 dollars and it works good if you don’t already have one.
Software needed.
Once the hardware components are bought then the software components can be loaded to run the Raspberry Pi with Kodi.
There are three install packages that can be used to install Kodi on a Raspberry Pi… Openelec, Raspbmc, and Xbian.
Each install package has its own positive and negatives. In the past I have always used Raspbmc but for the Raspberry Pi 2 it is recommended to run Openelec. The other packages simply haven’t been updated yet with images for the Raspberry Pi 2.
(Rasbmc has been updated and now called OSMC if you rather use it here is a write up on it.)
The Openelec image can be downloaded here.
Be sure to get the correct Image file for your Pi.
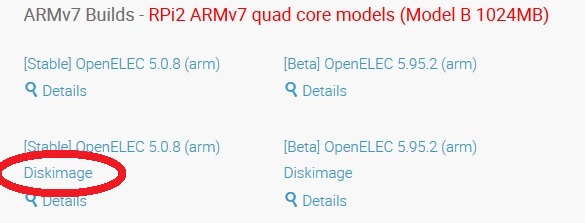
After downloading the image it will need to be written to a SD Card. Openelec can also be written to a USB flash drive but the most common method is to write it to a SD Card.
If you never written an image file before it is easy to do. A image file is a preset up operating system that needs to be written to bootable media such as a SD card.
With a image file of an operating system you do not need to go to the whole step-by-step install of loading drivers and selecting options.
Since the Raspberry Pi 2 specifications are already known the operating system can be pre-written and simply needs to be flashed to a SD card.
I use Win32 Disk Image to write images to flash drives or SD cards.
Win32 Disk Imager can be downloaded here. https://sourceforge.net/projects/win32diskimager/files/latest/download
Read the image downloads carefully and pick the correct one for your Raspberry Pi.
After downloading the image file extract it an than use Disk Imager to write the image to the SD Card or Flash Drive.
Steps to write the Openelec to the SD card.
1…Extract the OpenELEC image file.
2…Insert the SD Card into a computer slot
3…Open Win32 Disk Imager and load the Openelec image file
4…Select the drive the Sd card is on. (Be sure to select the correct drive as Win32 Disk Imager will write to what ever drive is selected even a hard drive!!)
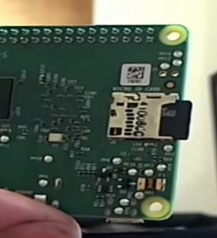
Once Openelec is written to a SD card, the SD Card can be taken to the Raspberry Pi and slid into the SD card slot.
At this point it is ready to be hooked up to the TV. To do this connect the HDMI cable to the TV (Sound and video will carry over the HDMI). Connect to the Internet with Ethernet or a Wi-Fi dongle, and connect a way to control input such as a keyboard or like me with a mouse.
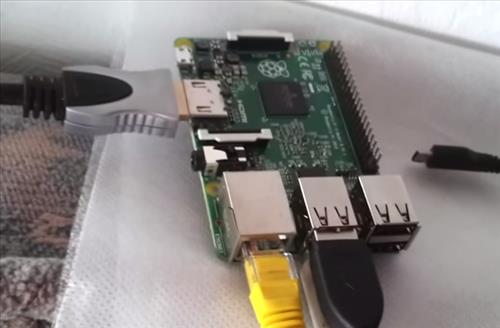
After everything is hooked up plug in the power supply and the TV will come up with the Openelec logo.

Kodi Helix logo will follow.

A welcome screen will come up with some simple steps to follow such as setting the language.
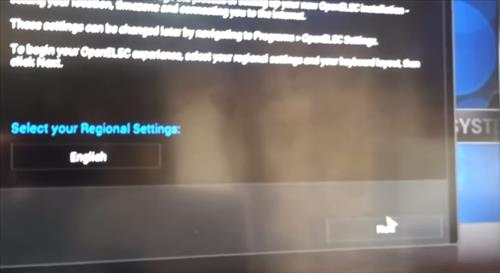
If you are using a WiFi dongle to connect to the internet select you router and enter your details.
At this point Kodi is installed and running on your Raspberry Pi 2, but it needs add-ons to really get the most from it. Add-ons are like apps for a smartphone that can be installed to add features to Kodi.
Hi,
Great article. You never mention NOOBS. I thought it was necessary to install NOOBS first? Thanks
Hi,
I want to set some personal image in Kodi as theme/background image. Is there any such article like the one above which I can refer to for this. your help and suggestions are appreciated.
Hi I have followed this guide and it’s extremely useful and perfectly set out. Just wondering though, I have a zip file for awesome streams that I’m wanting to add to my kodi sources, how would I go about adding a zip file to it with an rpi2 in order to install from the zip file through kodi. I have the zip file downloaded to my laptop but not sure what to do to get it onto kodi? Any tips would be greatly received.
Is there a way to pre-configure OpenElec or OSMC with all of the addon’s you want using a computer before placing it in the Pi for the first time so the same setup can be replicated more than once, such as if you would like to set up multiple Pi’s on multiple TV’s?
Yes, after you setup a SD-card with the software the way you like than create a image file for it that can be copied to another SD-card using Win32Disk Imager.
are the channels limited to the US?
i have a sony tv that has very few video apps that are streaming classics only! im exploring this options if viewing channels like hbo, amazon prime, history, discovery channel are possible.
Kodi uses add-on programs to stream content which there are many. It is used worldwide so it is not a USA only thing. You can always load it up for free on a computer to check it out. Here is a tutorial. https://www.wirelesshack.org/a-guide-to-kodi-and-watching-free-movies-and-tv-shows.html
Thank u so much u the best 🙂
i have the pi2 works well but can’t get the wifi to work on kodi can you pleas give some advice on it email
thank you kind regards
Ian
Is your WiFi dongle compatible with the RasPi 2? https://www.wirelesshack.org/raspberry-pi-compatible-wifi-adapter-dongles.html
Thank you so much, this was really helpful. I just have a question. When you say the Raspberry Pi B+ is laggy do you mean just on the menu? Is there much difference in playback between the B+ and the Raspberry Pi 2 B? I’m not sure which one to buy, since the B+ is cheaper, but I want to make sure that I’ll be able to use 1Channel and Genesis without buffering/stuttering.
I would definitely go with the RasPi 2 if you have a choice. It has a quad core while the B+ has only a single core, plus it has twice the Ram.
Also Kodi has been updating their core which requires more to run than when I was using it on a B+ model.
Thank you 🙂
Hallo,
Thank you. This content helpful me 🙂 Raspberry Pi 2 is excelent computer with unlimited options 🙂
It is very complicated bud interesting use of Raspberry Pi 🙂
Very clear explasnation and perfect layout of the images. nice job! I will try it soon this software.
Groetjes