This is a multiple part series for someone new to wireless pen testing, with pictures and videos.
Introduction To Kali and WiFi Pen Testing
How to Install Kali Linux
WEP Hacking
Kali Linux and Reaver
Getting a Handshake and a Data Capture, WPA Dictionary Attack
Using Aircrack and a Dictionary to Crack a WPA Data Capture
Cracking a WPA Capture with the GPU using HashCat
Next Creating a Dictionary / Wordlist with Crunch Part 8
Installing Kali Linux
Kali Linux is free to download and install. The Kali files can be big 2-3 GB depending on the type of file you download.
There is three ways to install Kali Linux, install to the hard drive, boot off a DVD, or run it in virtualization.
I will talk about how each install works, but if you are new to Kali Linux,the easiest way is to burn the Kali Linux ISO to a DVD or a flash drive and boot off of it, of course once the computer restarts data can be lost if not stored correctly.
Running Kali Linux within virtualization is possibly the most common way. Mainly because a familiar operating system such as Windows can be run at the same time and files transferred between the two easily. This does take up computing resources, and can add another layer of troubleshooting if a problem arises, such as Kali not recognizing a USB adapter.
If you are just starting out it may be easier to start by using a Boot DVD then move on to virtualization later, but this is a personal option and depends on your own experience and knowledge of using Operating Systems.
Booting from a DVD
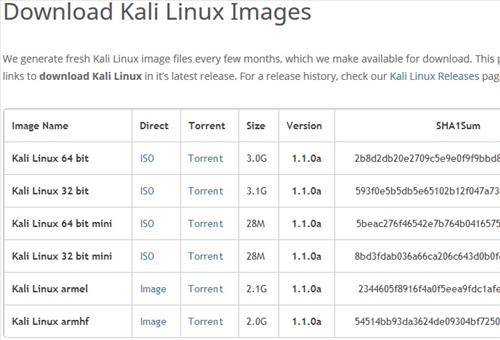
To boot off a DVD or Flash drive the Kali Linux ISO will be needed. The download can be found here https://www.kali.org/downloads/ You will need to download the 64 Bit version or 32 Bit version depending on your computer. If in doubt use the 32 Bit version as it will work on a 64 bit system.
ISO burning software will be needed. You most likely already have ISO burning software such as certain version of Nero, but if in doubt use Power ISO which can be downloaded here.
http://www.poweriso.com/download.php

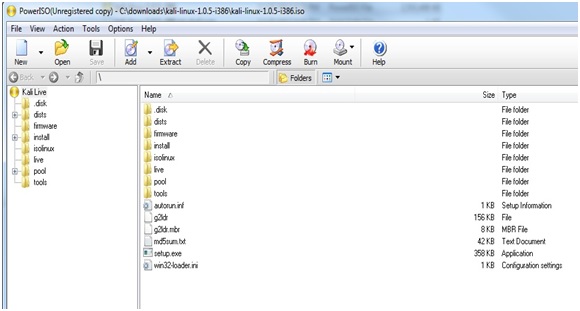
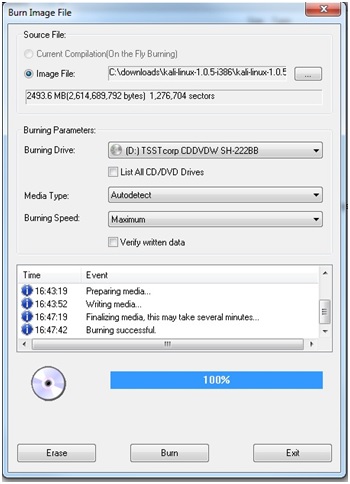
Once the ISO is downloaded, load the Kali Linux ISO into your burning software and burn it to a DVD.
After the ISO has been burned to a DVD it now can be used as a Live Disk or used to install to the hard drive.
To boot from the DVD put it into the computer drive and check the computer settings to boot from the disk. Most computers have a boot option button to press or will automatically boot the disk.
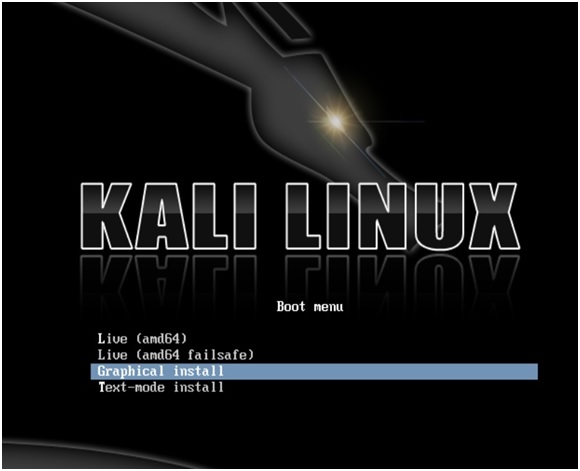
Once it boots from the DVD it should come to the following menu.

When Kali Linux is running in Live Mode it is running from the DVD drive not the hard drive. Be careful not to install to the hard drive as this will wipe any existing operating system. Use only the live options.
Selecting Live (686-pae) or Live (amd64) will boot to a dark GNOME desktop.
The default username and password for Kali Linux is root then toor.
Username: root
Password: toor
Quick Steps to creating Kali Linux ISO Boot DVD
1…Download the Kali Linux ISO
2…Download PowerISO or any ISO burning utility, if you do not have one.
3…Install PowerISO or open ISO DVD burning software.
4…Install a DVD into the DVD burner and open PowerISO.
5…Open the Kali Linux ISO file in PowerISO then click burn and burn the Kali Linux image file to DVD.
6…Use the DVD to boot the computer to Kali Linux.
Installing Kali Linux to the Hard Drive
The ISO will be needed to be burn Kali to a DVD and install to the hard drive. This is the same as the above booting off the DVD except once Kali Linux is up and running use the Install option.
Any existing Operating System will be wiped out with this option and only Kali Linux will be installed if this is done!
You can install with a graphical interface or text interface. The graphical interface is easy to understand and follow so choose this.
After choosing install a series of questions will be asked in this order.
Language
Host name (Use Kali)
Password
Time Zone
Partition space
Format
Kali Linux can be setup to dual boot along with an existing Operating System, but explaining how to do a dual boot is more advanced. If something goes wrong the existing Operating System will be gone or damaged.
Installing and Running with VMware
Running two operating systems at the same time is quite common now and done relatively easy. Two things will be needed the Kali Linux VMware Image and VMware Player or Workstation.
For those who do not know VMware is a way to run another operating system virtually within another operating system. Basically, if you are running Windows and want to run a Kali Linux install at the same time you can do this with VMware.
VMware works very well and as long as you have a fairly recent computer it should run fine. If you have an older laptop or an older computer then the ISO may be better. Mainly because a ISO can be burned to a disk or any bootable device and booted from. When Kali Linux is booted off an ISO disk, then it does not need to run Windows in the back ground.
VMware Workstation is not free but there is a free version called VMware Player. VMware Player doesn’t come with all the options Workstation does, but it does work, and runs Kali Linux fine.
You will have to scroll down to the bottom of the page find the free download of VMware Player.

Once you have VMware Player you will need the VMware Image file from the Kali Linux site. From the download site here
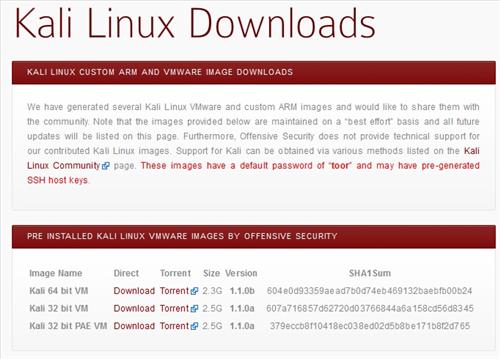
The VMware Image is a preset up install that can be loaded straight into VMware and be ready to use. Most likely you have a computer that can run 64 bit version, but if in doubt use the 32 bit version which can run on both a 64 and 32 bit computer.
Once both VMware Player and the Kali Linux VMware Image is downloaded, run and install VMware Player and follow the default options.
The Kali Linux VMware Image will have to be extracted and will create its own folder with a bunch of files in it.
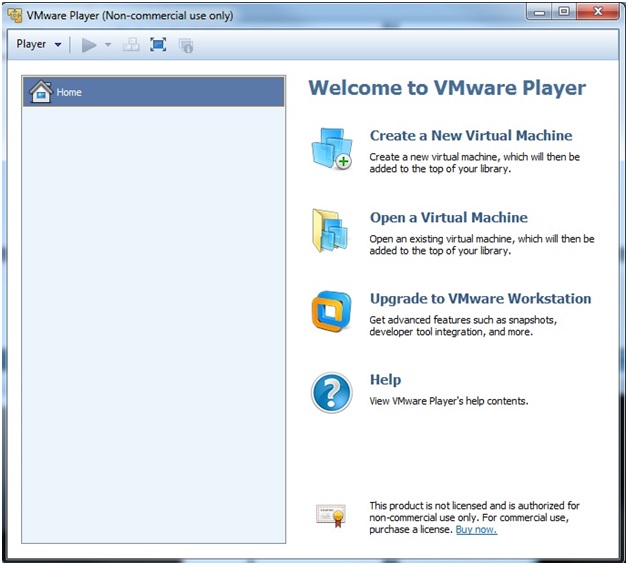
Once it is done extracting all the files, run VMware Player and on the right click “Open a Virtual Machine.” A dialog box will come up simply direct it to the folder with the extracted Kali Linux VMware Image.
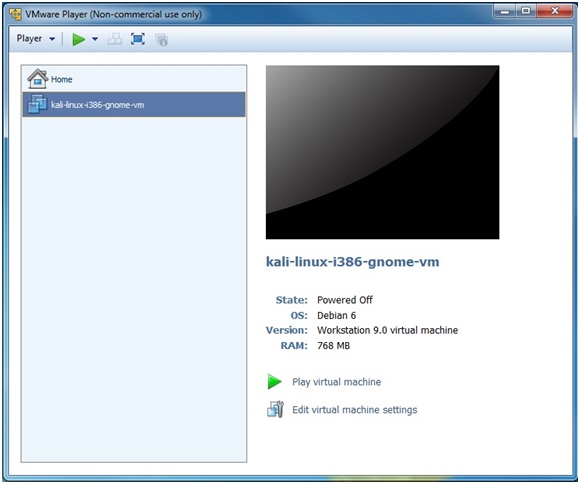
Only one file will come up because of the .VMX extension click on it and you then will be able to play virtual machine and run Kali Linux.
The default username and password for Kali Linux is root then toor.
Username: root
Password: toor
Quick steps to installing Kali Linux and VMware player
1…Download VMware
2…Download the Kali Linux VMware image file from the download site,
3…Extract the files.
3…Install VMware: follow the default options
4…Once VMware is installed go to Open a Virtual Machine, go to VMware Kali Linux Image file location and click on the file. Kali Linux will open and come up to a logon screen. The user name is root and the password is toor.  
Next Kali Linux and WEP Hacking
i have a laptop and i m using endless os so how can i install kali linux
looking forward to be learning linux i want projects for hacking and commants
In desktop PC how WiFi adapter is to be configure
fhdaksfsadfjasdfjhsdafjhk
You on meth, bruh?
i have my laptop…it has wifi..sooo
router is required?….plz reply faast.
if u have wifi in your laptop then u don’t required wifi router u just have toopen command prompt in admin mode & type this command
1) netsh wlan set hostednetwork mode=allow ssid=Hotspot key =Pass@123
2)netsh wlan start hostednetwork
thats it. your wifi with name as Hotspot is started with password as Pass@123
it’s very helpful as a consol Security
thanks for asistance